To know how to install a garbage disposal will depend on your ability to understand the process. This guide is universal to most all types of garbage disposals. It will also help you if you’re looking to install a garbage disposal without a dishwasher. First you will want to turn the water off to the sink you will be installing a garbage disposal under.
Tools & Supplies Needed:
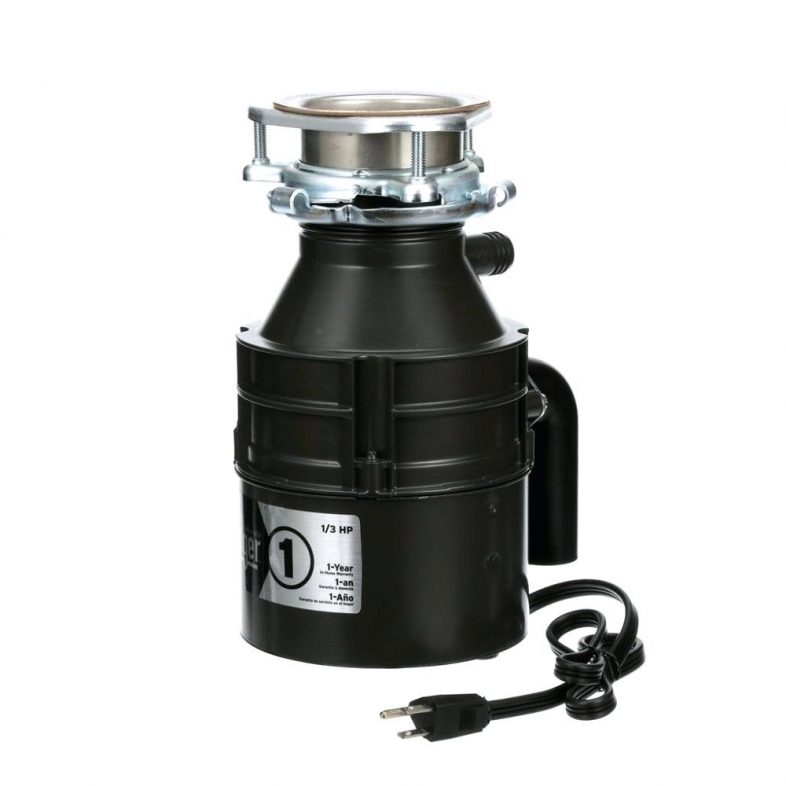
- Badger Garbage Disposal
- 3ft Power Cord
- 1/2 inch romex connector
- Plumbers Putty or Silicone
- Phillips and Flathead Screwdrivers
- Needle-nose Pliers
- Channellocks
- Garbage Disposal How to Video
While you’re turning the water off it would be a good time to turn the power off to the receptacle under the sink to the garbage disposal for safety reasons.
If you are starting with a new badger garbage disposal then depending on if you have a single or double sink you will need to decide which side to install the food disposal on. The steps for installing a garbage disposal will be the same for both types of sinks.
This tutorial assumes you have the electrical in place already and that you do not already have a garbage disposal under your sink.
Let’s start by opening the box your disposal is packed in and pull out the contents of the package. You should have a connecting flange with stopper, drain kit and garbage disposal. One item that is not included with most garbage disposals is the pig tail power cord.
We are going to start with the flange and getting it mounted to the sink in the middle. You will need to take some plumbers putty and pinch off enough to make it around the sink flange. The size of the putty should be about the size of a pencil. Just to be clear there are 2 flange parts. . . one is a mounting flange the other is the sink flange. Both work together to keep them attached to the sink drain hole.
Drop the sink flange in from the top into the sink drain hole. . . note: having a second person to hold the flange in place is helpful as it will move upward as you try to put the mounting flange on. Once you have pushed the mounting flange on there should be a snap ring to go on afterwards to hold the flange assembly together. You can then proceed to tighten the thumb bolts hand tight. You will then need to use your pliers or philips screwdriver to tighten the bolts the rest of the way.
It is normal for excess plumber putty or silicone to be pressed out around the sink flange on the inside. If using plumbers putty just take your finger and wipe around the sink flange collecting the excess plumbers putty. If using silicone take a wet rag and wipe it around the sink flange multiple times to clean excess silicone out.
Its now time to prep the disposal itself for mounting to the flange. Take the disposal out of the box if you hadn’t already.
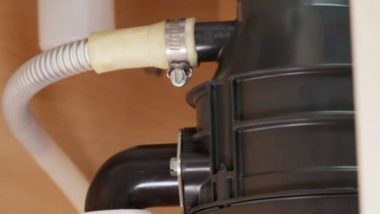
The discharge tube has 3 parts depending on your model of garbage disposal. You should have a discharge tube, o-ring and mounting flange. Slide the mounting flange over the drain tube and put the o-ring on the tube end that mounts to the disposal. Insert the 2 mounting bolts for the flange and proceed to tighten them. Do not over tighten but they should not be able to be turned with your fingers when done.
Turn the garbage disposal up side down to view the bottom of the disposal. There’s an access plate with a screw in it, remove that screw and remove the plate to reveal the wires to the disposal. There is an additional hole with thread or a knockout for a romex wire connector. If its threaded then remove the nut from your 1/2 inch romex connector and thread your connector in. If its a knockout then take pair of needle nose pliers and hit the center of the knockout until it opens up to grab the knockout with the pliers and you can twist it out. This shouldn’t be difficult at all to do.
Now take your 3ft power cord and insert the opposite end of what plugs into the wall through the romex connector. Pull the cord through from within the access area about 6 inches and strip the shielding off about 3 inches to reveal the wires. Then one at a time strip the black, white and green wires about 3/4 of an inch.
Depending on the 3ft power cord there may be different color wires but the standard is black, white and green. Once you have striped the wires you are ready to make your connections. Twist the black to black, white to white and green to green or there maybe a green ground screw to attach to. Then twist on a wire nut for each of the wires protecting them from grounding out or shocking you during use.
Pro tip: For added security of the wires and wire nuts you can and should wrap electrical tape around each wire nut and wires.
Now stuff the wires back into the access under the warning label if applicable then put access plate back on. Now you’re ready to mount the disposal to the mounting flange under the sink.
TIP: Make sure to orientate your disposal to the proper drain location so the discharge tube lines up with the drain P-trap.
This can be done with 1 person as often times there is only enough room under the sink for 1 person and even then its not enough. So time to contort your body in ways you never thought possible and professional plumbers understand this more than anyone. Garbage disposals are not extremely heavy but they aren’t light either. Often times you have to hold the disposal in one hand and lift while trying to turn the locking ring to lock it to the mounting flange with the other hand.
Once you get the disposal on and the locking ring partially on don’t relax too much yet. You will need to use the supplied tool to tighten the locking ring up securely to the mounting flange. It will only go so far so do not force the ring too much and cause the flange to twist inside the sink.
Now hook up your drain system to your new garbage disposal discharge tube. Now you’re ready to plug it in and turn it one to test it.
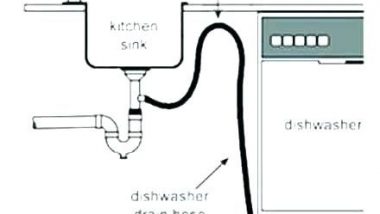
To learn more about How to install a garbage disposal with a dishwasher?