So you want to know how to install a dishwasher? Well its not as hard as it may seem and can be done in about an hour or less for an expert. A DIY person should be about a 2 hour job at most with the help of this article and how to video.
Note: You may or may not need everything in the tools and supplies list. So check your dishwasher box contents for items you may need for installation. Each model of dishwasher may have different hardware contents. You can also ask a store associate for requirements of a particular model.
Tools and Supplies Needed:
- Hitachi Drill
- 1″ Paddle Bit
- Adjustable Wrench
- Phillips and Flathead Screwdrivers
- Slip Joint Pliers
- Wire Brush
- Dishwasher Unit
- Dishwasher Bracket for Stone
- 1/2 x 3/8 x 3/8 Shutoff Valve
- Dishwasher Installation Kit
- 1/2 or 3/4 Conduit Hanger
- Dishwasher How To Video
This article assumes that all plumbing and required electrical outlet is in place for proper operation of your dishwasher.
Turn both water and power off to the plumbing and outlet under your sink. This may require you to turn the water off at the water meter if no other shut off valves are present. You will need to start by adding the 1/2 x 3/8 x 3/8 valve to the hot water supply under the sink. To do this you will need to disconnect the supply hose from the valve on the left providing the plumbing is set up correctly.
Hot water supply is on the left and cold water is on the right. So make sure to turn the valve off before you loosen the hose on the valve. When you have done this then proceed to removing the supply line from the valve then remove the valve from the water line coming from the wall.
You will need to use a pair of adjustable wrenches to remove the valve. This is so that you do not twist the copper pipe. If its just a stub out iron pipe then you may need to use an adjustable wrench and a pipe wrench to hold the iron pipe in place so it don’t turn loose in the wall. Turn the valve counter clock wise to remove the valve.
Once you have removed the valve clean the threads on the pipe or copper connection coming out of the back of the cabinet or wall with a wire brush. Then take the Teflon tape wrap it around the threads of the of the pipe coming out of the wall 2 or 3 revolutions in a clock wise rotation. Then take the rector seal and brush on the threads over the Teflon tape. It does not take a lot of this compound to help seal the threads.
Note: Teflon tape and Rector seal help to seal the threads on the connection. They act as a lubricant to make turning the connections easier.
Now you’re ready to install the 1/2 x 3/8 x 3/8 valve onto the pipe threads. Start by turning it valve by hand onto the threads. It will get harder to turn by hand as you go but it shouldn’t be instantly hard so if it is difficult from the beginning it may be that you have cross threaded it or there is an obstruction. So check your threads both on the pip and the valve. When you can turn it by hand no more you will need to use your tools at this point. Using two adjustable wrenches in any combination will assist you to turn the valve 1 full turn to where 1 3/8’s connection is facing up to the faucet and the other points to the toward the dishwasher which ever side that may be.
At this point you can now reconnect your faucet hose back onto the valve.
Next you will need to take your drill and 1″ paddle bit and drill a hole through the side corner in the back of the cabinet toward your dishwasher. Code requires that the hole be drilled at the bottom of the cabinet floor through the side wall.
You’re now ready to prep the dishwasher for installation. So if you haven’t already done so you need to unpack your dishwasher. Remove the contents from inside the dishwasher itself. You may find an operation and installation manual, drain hose extension plus other discard items. When you have unpacked it and have room rotate the dishwasher on its back to gain access to the power and to the water supply connection.
We will start with the water supply connection. So if your dishwasher requires an installation kit then there are a number of items that could be in that kit. For example it might be a supply hose, water line elbow, power cord, romex connector and other hardware for installing a dishwasher. We need the water line elbow that has a threaded end that looks like the end of a water hose and a 3/8 end for the supply hose connection.
Now most braided supply hoses have a rubber seal in them so no need to use Teflon tape or sealant for the 3/8 connection. First turn the elbow to fasten it to the dishwasher inlet threads turning it clockwise for tightening it hand tight. Then take your locking pliers and give the fitting a final snug turn that won’t come off. Do not over tighten this fitting.
Next screw one end of the 3/8 braided hose to the 3/8 connection on the elbow you just finished adding. Once you are done here you can lay the hose aside and begin to work on the wiring.
There is an electrical access box for the power cord to be added to. You will need to take the cover off the access to expose the wires so that the power cord can be wired to the dishwasher. There may or may not be a knockout on the access for the romex connector. If there is knock that out and begin attaching the romex in the hole of the knockout.
After you have added the romex connector its time to push the wire end of the power cord in through the romex connector and tighten the 2 screws down so that the cord don’t pull out. You will want to push about 6 inches of cord through the back of the romex into the access. Strip about 3 inches of shielding that holds all three wires. Then strip about 3/4 of an inch off the 3 wires and twist the wires together black to black, white to white and green to green and put a wire nut over each twisted pair.
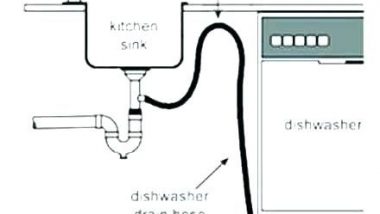
Now replace the access panel and move onto the next part and that is attaching the drain extension if applicable to the drain hose by pushing the two ends together. now you can raise the dishwasher back up in the upright position and make sure that all the hoses and power cord are behind the dishwasher now. Depending on the model of dishwasher you have you will need to attach the brace brackets to the dishwasher. Some of these attach to the sides and some attach to the top.
Since you finished that in record time push the dishwasher closer to the counter where it will sit. Now take your power cord and push it through the hole you drilled in the side of the cabinet. The push the drain hose through the same hole. Lastly push the water supply line through that hole as well. While simultaneous pushing the dishwasher in place pull the drain hose, power cord and water supply line.
Once you have the dishwasher pushed back in place under the countertop go ahead and make adjustments on the feet in front if necessary. Other than that its time to fasten the bracket to either the side of the cabinet or underside of the counter. So open the door of your dishwasher and look at the placement of your brackets. You will need to add a screw that should be with the brackets 1 screw to each bracket. Put your screw in that bracket and with a drill attach it to your cabinet.
Note: If you have a stone/granite countertop and that is where you have to attach then you will need to get an after market bracket that attaches to the cabinet walls on the inside and spans the opening where the dishwasher is then attach to that bracket.
Finalizing the dishwasher installation process by attaching the supply line to the valve with the open 3/8 connection. Then taking the drain hose straight up the corner wall and attaching a conduit strap over the drain hose at the top of the cabinet under the countertop. This prevents food waste from flowing backwards into the dishwasher from the garbage disposal. Now attach the drain hose to the garbage disposal and apply the provided clamp. You can now plug in your dishwasher and garbage disposal and test for proper operation.