Few household nuisances are as consistently irritating and wasteful as a running toilet. That persistent, ghostly whisper of water, the sudden, phantom refills, and the escalating water bill can quickly turn a minor annoyance into a major headache. More often than not, the culprit behind these common issues is a failing toilet fill valve. But before you call in a plumber, take a deep breath. Replacing a toilet fill valve is one of the most straightforward and rewarding DIY plumbing tasks you can undertake, requiring minimal tools and a bit of confidence. This comprehensive guide will equip you with the knowledge and steps to tackle this project yourself, saving you money and restoring peace to your bathroom.
As an industry authority with years of hands-on experience in the construction trades, I’m here to demystify this process. We’ll walk through everything from understanding how your fill valve works to a detailed, step-by-step replacement, ensuring you approach the task with expertise and leave with a perfectly functioning toilet. Let’s silence that drip and regain control of your commode.
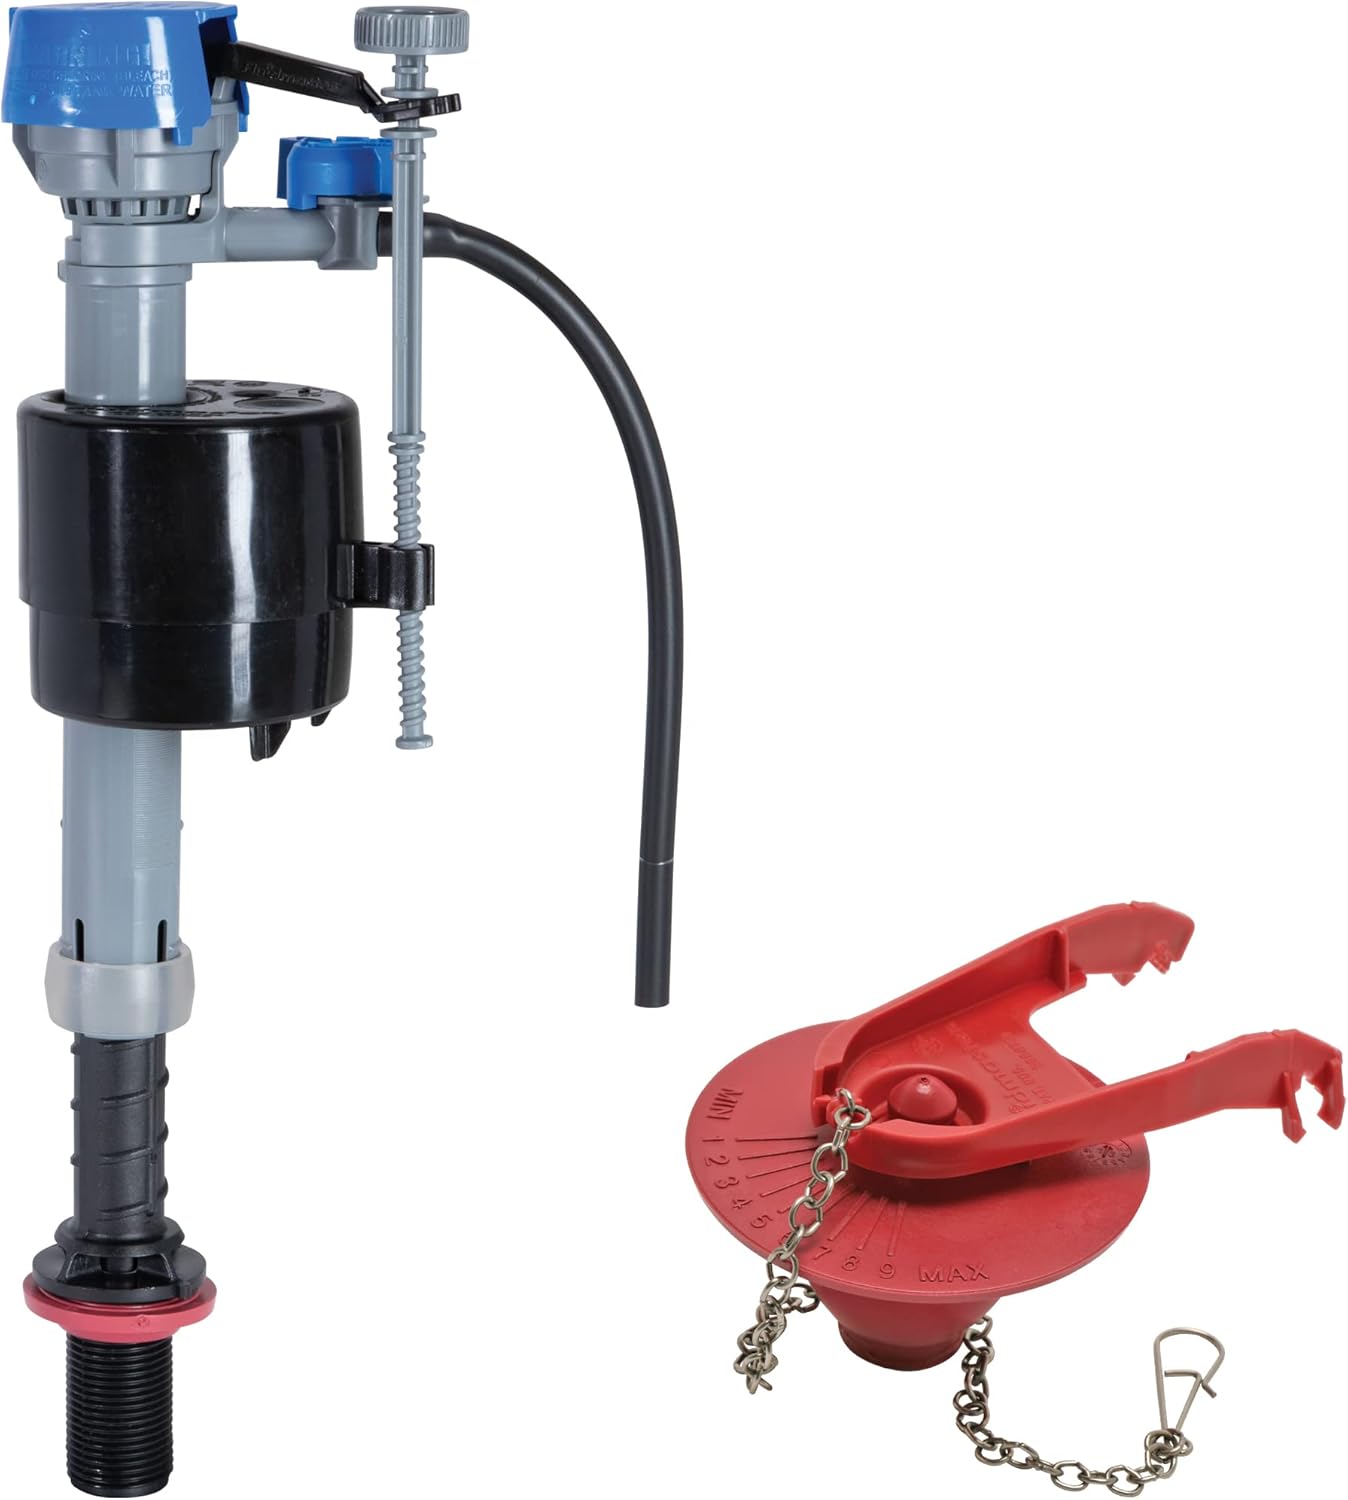
Essential Materials, Parts, and Tools for Replacing a Toilet Fill Valve
Before you begin, gathering your supplies is crucial. Having everything on hand will ensure a smooth, uninterrupted replacement process. Here’s what you’ll need:
Parts:
-
- New Universal Toilet Fill Valve Kit: Most modern fill valves are designed to be universal, fitting a wide range of toilet models. Look for a kit that includes the fill valve assembly, shanks, washers, and a refill tube. Brands like Fluidmaster are widely available and reliable.
Tools:
-
- Adjustable Wrench or Channel Locks: Essential for loosening and tightening nuts on the water supply line and the fill valve shank.
-
- Sponge: For soaking up residual water in the tank.
-
- Small Bucket or Bowl: To catch any water that drains when disconnecting the supply line.
-
- Old Towels or Rags: To protect your floor and for general cleanup.
-
- Utility Knife or Scissors (Optional): Useful for cutting the refill tube to the correct length or carefully removing old, stubborn parts.
-
- Safety Glasses (Recommended): Always a good practice when working with tools and in confined spaces.
Understanding Your Toilet’s Fill Valve and Why It Fails
At the heart of your toilet’s operation is the fill valve, a seemingly simple mechanism responsible for refilling the tank after each flush. To successfully approach replacing a toilet fill valve, it helps to understand its function and common failure points.
How a Fill Valve Works:
When you flush, the flapper lifts, allowing water from the tank to rush into the bowl, creating the siphon action that clears waste. As the tank empties, the water level drops, causing a float mechanism within the fill valve to fall. This drop opens a valve, allowing fresh water from your home’s supply line to flow into the tank. As the tank refills, the float rises with the water level. Once the water reaches the predetermined fill line, the float triggers the valve to close, shutting off the water flow. Simultaneously, a small refill tube channels a portion of this incoming water directly into the toilet bowl itself, refilling the bowl’s trap to maintain a water seal against sewer gases.
Common Signs of a Failing Fill Valve:
-
- Constant Running Water: The most obvious sign. If your toilet continuously runs or cycles on and off without being flushed, the fill valve might not be shutting off completely, often due to a faulty float mechanism or worn internal seals.
-
- Slow or No Refill: If your toilet takes an unusually long time to refill after a flush, or doesn’t refill at all, the fill valve might be partially clogged or its internal components are failing to open correctly.
-
- Unusual Noises: Hissing, gurgling, or sputtering sounds from the tank when the toilet isn’t flushing can indicate issues with the fill valve’s operation or water pressure problems exacerbated by a failing valve.
-
- High Water Bills: A continuously running toilet can waste hundreds of gallons of water per day, leading to a significant spike in your utility costs.
Understanding these symptoms and the basic mechanics empowers you to confidently diagnose the problem, confirming that replacing a toilet fill valve is indeed the necessary fix.
Preparing for the Replacement of Your Toilet Fill Valve
Proper preparation is key to a smooth and mess-free repair. Don’t rush this stage; a few moments spent here can save you considerable hassle later.
-
- Shut Off the Water Supply: Locate the water supply shut-off valve, usually on the wall behind the toilet, near the floor. Turn the handle clockwise until the water flow completely stops. If your toilet doesn’t have a dedicated shut-off, you’ll need to turn off the main water supply to your house, which is less ideal but sometimes necessary.
-
- Flush the Toilet to Empty the Tank: With the water supply off, flush the toilet. Hold the handle down to allow as much water as possible to drain from the tank into the bowl. This will empty the tank and reduce spillage during the replacement.
-
- Remove Remaining Water: There will likely be a small amount of residual water in the bottom of the tank. Use your sponge to soak up this water. Wring it out into your bucket until the tank is as dry as possible. This prevents water from spilling onto your floor when you disconnect the old valve.
-
- Clear the Work Area: Lay down your old towels or rags around the base of the toilet and directly under the water supply line connection. This will catch any drips or spills. Arrange your tools and new fill valve kit within easy reach.
-
- Inspect the Existing Setup: Take a moment to observe how the old fill valve is installed. Notice how the supply line connects to the bottom of the valve and how the refill tube connects to the overflow tube. This visual memory will be helpful during the installation of the new valve.
Pro Tip: Before disconnecting anything, take a quick photo of the existing fill valve assembly with your phone. This can serve as a handy reference if you get confused during the reassembly process.
The Step-by-Step Guide to Replacing a Toilet Fill Valve
Now that you’re prepared, let’s dive into the core task: actually replacing a toilet fill valve. Follow these steps carefully, and you’ll have your toilet operating perfectly in no time.
Step 1: Disconnect the Water Supply Line
-
- Place your small bucket directly under the connection point where the flexible water supply line meets the bottom of the toilet tank.
-
- Using your adjustable wrench or channel locks, carefully loosen the nut that connects the supply line to the old fill valve. Turn it counter-clockwise. Expect a small amount of water to drip out, which your bucket will catch.
-
- Once loosened, unscrew the nut by hand and gently pull the supply line away from the toilet.
Step 2: Remove the Old Fill Valve
-
- Inside the tank, disconnect the small refill tube from the top of the overflow pipe. It usually just pulls off.
-
- Underneath the toilet tank, you’ll see a large plastic or metal nut securing the fill valve to the tank. Use your adjustable wrench or channel locks to loosen this nut by turning it counter-clockwise.
-
- Once the nut is completely removed, you can lift the old fill valve straight up and out of the toilet tank. It might require a slight twist to free it from any internal tank components.
-
- Clean any residue or debris from the hole in the tank where the fill valve was seated. This ensures a good seal for the new valve.
Step 3: Install the New Fill Valve
-
- Take your new universal fill valve. It typically comes with a large rubber washer (sometimes tapered) that slides onto the bottom shank of the valve. Ensure this washer is properly seated. This is critical for preventing leaks.
-
- Insert the threaded shank of the new fill valve down into the hole in the bottom of the toilet tank, ensuring the fill valve body is oriented correctly within the tank (usually opposite the flush handle).
-
- From underneath the toilet tank, slide the large plastic mounting nut (provided with the new valve) onto the threaded shank. Tighten this nut by hand first until it’s snug. Then, use your adjustable wrench or channel locks to tighten it an additional quarter to half turn. Do not overtighten, as this can crack the tank, but ensure it’s firm enough to prevent leaks.
Step 4: Connect the Refill Tube
-
- Attach the small refill tube from the new fill valve to the top of the overflow pipe. Many new kits include a small clip to secure this tube. Make sure the end of the refill tube is directed down into the overflow pipe, but not so far that it’s below the water level when the tank is full.
Step 5: Reconnect the Water Supply Line
-
- Carefully reattach your flexible water supply line to the threaded shank on the bottom of the new fill valve.
-
- Tighten the connection nut by hand until it’s snug. Then, use your adjustable wrench or channel locks to tighten it an additional quarter to half turn. Again, avoid overtightening, but ensure a secure, leak-free connection.
Step 6: Restore Water Supply and Check for Leaks
-
- Slowly turn the water supply shut-off valve back on by rotating it counter-clockwise. You’ll hear water begin to flow into the toilet tank.
-
- Immediately inspect all connections – especially where the supply line meets the fill valve and where the fill valve mounts to the tank. Look for any drips or seepage. If you see any, gently tighten the corresponding nut a tiny bit more until the leak stops.
Step 7: Adjust Water Level
-
- Once the tank fills, observe the water level. Most fill valves have an adjustment screw or a movable clip on the main body of the valve. Adjust this mechanism to set the water level to the marked fill line inside your toilet tank (usually a line stamped on the tank wall).
-
- Flush the toilet several times to ensure the fill valve cycles correctly and the water level returns to the desired height after each flush.
Crucial Takeaway: Always avoid overtightening nuts, especially those made of plastic. Snug and a quarter-turn is usually sufficient. Overtightening is a common cause of leaks and cracked components.
Testing and Troubleshooting After Replacing Your Toilet Fill Valve
You’ve successfully installed your new fill valve – great job! But the work isn’t quite done until you’ve thoroughly tested it and addressed any potential issues. A proper check ensures your efforts result in a reliably functioning toilet.
Initial Testing Protocol:
-
- First Flush: Perform a full flush. Listen for the sound of the flapper closing correctly and the new fill valve engaging. The tank should begin to refill promptly and smoothly.
-
- Observe Refill Cycle: Watch the water level rise. It should fill to the marked fill line within the tank and then stop decisively. There should be no continued trickling or “hissing” sound once the tank is full.
-
- Check Bowl Refill: Ensure the bowl also refills to its normal operating level. This confirms the refill tube is correctly channeling water from the fill valve into the overflow tube.
-
- Leak Inspection (Again!): This is paramount. With the toilet now fully functional, carefully inspect all connection points once more. Run your finger around the base of the fill valve where it meets the tank and around the water supply line connection. Even the smallest drip can indicate an issue.
Common Troubleshooting Scenarios:
-
- Toilet Still Running or Cycling On/Off:
-
- Water Level Too High: The fill valve might not be shutting off because the water level is above the overflow tube, causing water to constantly drain. Adjust the fill valve’s float mechanism down until the water level is below the overflow tube and at the tank’s fill line.
-
- Flapper Leak: The issue might not be the fill valve at all, but rather a faulty flapper that isn’t sealing properly. Check the flapper for wear, cracks, or debris preventing a good seal. You might need to replace the flapper.
-
- Refill Tube Issue: Ensure the refill tube is properly directed into the overflow tube and not pushing water above the overflow level.
-
- Toilet Still Running or Cycling On/Off:
-
- Slow Tank Refill:
-
- Partially Closed Supply Valve: Double-check that the water supply shut-off valve is fully open.
-
- Kinked Supply Line: Inspect the flexible water supply line for any kinks or bends that could restrict water flow.
-
- Fill Valve Filter Clog: Some fill valves have a small screen filter at the base where water enters. If debris got in during installation, it could restrict flow. You might need to carefully remove the fill valve, check, and clean this filter.
-
- Slow Tank Refill:
-
- Water Level Too Low:
-
- Float Adjustment: The fill valve’s float mechanism needs to be adjusted upwards to allow more water into the tank.
-
- Flapper Closing Too Soon: If the chain connecting the flush handle to the flapper is too short, the flapper might be closing before enough water has left the tank, creating a false “full” signal. Adjust the chain length.
-
- Water Level Too Low:
-
- Leaks from Connections:
-
- Loose Nuts: Gently tighten the fill valve mounting nut (under the tank) or the water supply line nut a slight bit more (quarter turn at a time) until the leak stops. Remember not to overtighten.
-
- Worn Washers: If leaks persist despite tightening, the rubber washers (especially the one between the fill valve and the tank, or in the supply line nut) might be faulty or improperly seated. You might need to disassemble and re-seat them or replace them if they are visibly damaged.
-
- Leaks from Connections:
Most post-installation issues are minor and easily resolved with a bit of systematic checking and adjustment. Don’t be discouraged if your first flush isn’t perfect; troubleshooting is a normal part of any DIY project.
Maintaining Your New Fill Valve for Longevity
You’ve successfully tackled replacing a toilet fill valve, restoring efficiency and quiet to your bathroom. To ensure your new fill valve provides years of trouble-free service, a little preventative maintenance goes a long way.
Regular Inspections:
-
- Listen and Watch: Periodically, take a moment to listen to your toilet. Does it run silently when not in use? Does it refill quickly and stop definitively? Visually check the water level in the tank to ensure it’s still at the correct fill line.
-
- Visual Check for Wear: Every few months, lift the tank lid and quickly inspect the fill valve. Look for any visible wear on plastic components, mineral buildup, or signs of the float mechanism sticking.
Cleaning the Fill Valve Filter:
Many modern fill valves include a small screen filter at the base of the valve, designed to catch sediment before it enters the mechanism. Over time, especially in homes with hard water or older plumbing, this filter can become clogged, leading to slow refills or poor valve operation. While the exact method varies by manufacturer, cleaning usually involves:
-
- Shutting off the water supply and flushing the toilet to empty the tank.
-
- Disconnecting the water supply line from the bottom of the fill valve.
-
- Carefully prying out or unscrewing the filter screen from the bottom of the valve shank.
-
- Rinsing the screen under running water to remove any trapped debris. A small brush (like an old toothbrush) can help dislodge stubborn mineral deposits.
-
- Reinserting the clean filter and reconnecting the supply line.
Addressing Hard Water Issues:
If you live in an area with hard water, mineral deposits (limescale) can accumulate on the moving parts of your fill valve, eventually causing it to stick or malfunction. While a whole-house water softener is the best long-term solution, regular cleaning of the valve’s exposed components with a mild descaling solution (like vinegar) can help. Always ensure to rinse thoroughly after using any cleaning agent.
By investing just a few minutes in these simple maintenance checks, you can significantly extend the life of your new fill valve and prevent future plumbing headaches. A proactive approach to home maintenance empowers you as a homeowner and saves you money in the long run.
Conclusion
Congratulations! You’ve successfully navigated the process of replacing a toilet fill valve, transforming a common plumbing problem into a confidence-boosting DIY triumph. From understanding the inner workings of your toilet to skillfully executing each step of the replacement, you’ve gained invaluable practical knowledge and saved yourself the expense of a service call. Your toilet now runs quietly, efficiently, and reliably, proving that with the right guidance and a willingness to learn, many household repairs are well within your capability.
Embrace this newfound skill and the satisfaction that comes with it. Every successful DIY project builds your competence and empowers you to take on even more challenging tasks around your home. Keep this guide handy, and remember that informed action is the cornerstone of effective home maintenance. Don’t let plumbing worries intimidate you; tackle them head-on, and enjoy the fruits of your labor. Your quieter bathroom is a testament to your efforts!
Frequently Asked Questions (FAQs)
Q1: How long does a toilet fill valve typically last?
A1: The lifespan of a toilet fill valve can vary significantly based on water quality, usage, and the quality of the valve itself. On average, a well-maintained fill valve should last between 5 to 10 years. Hard water, which causes mineral buildup, can shorten its life, while softer water can extend it.
Q2: Can I replace a fill valve without draining the tank completely?
A2: While you can theoretically disconnect the water supply line and remove the old valve without fully emptying the tank, it’s highly recommended to drain the tank as much as possible. This minimizes spills, makes the job cleaner, and gives you better access to clean the tank’s interior before installing the new valve. Use a sponge to remove any remaining water.
Q3: Why is my toilet still running after replacing the fill valve?
A3: If your toilet continues to run after replacing the fill valve, the issue is likely elsewhere. Common culprits include:
-
- Faulty Flapper: The flapper might not be sealing correctly, allowing water to continuously leak into the bowl. Inspect it for wear, cracks, or debris.
-
- Improper Water Level Adjustment: The water level might be set too high, causing water to constantly spill into the overflow tube. Adjust the fill valve’s float mechanism down.
-
- Refill Tube Issues: Ensure the refill tube is correctly positioned into the overflow pipe and not siphoning water improperly.
Start by checking the flapper and water level adjustments first.
Q4: Do all fill valves fit all toilets?
A4: Most modern toilet fill valves are designed to be “universal,” meaning they can fit a wide range of standard toilets, including those with different tank heights. They typically feature an adjustable shaft to accommodate various tank depths. However, older toilets (especially those with ballcock mechanisms) or some specialty low-profile toilets might require a specific type of fill valve. Always check the product description for compatibility if you have a non-standard toilet.
Q5: What’s the difference between a fill valve and a flapper?
A5: These are two distinct components with different functions:
-
- Fill Valve: Located on the left side (usually) of the tank, this mechanism controls the flow of fresh water into the tank after a flush. It shuts off the water once the tank reaches the appropriate level.
-
- Flapper: Located at the bottom center of the tank, the flapper is a rubber or plastic seal that lifts when you flush, allowing water to exit the tank into the bowl. When the tank empties, the flapper falls back into place, sealing the drain hole so the tank can refill.
Both are critical for a properly functioning toilet, and often, their issues can be mistaken for one another.